
By Automotive Research TeamUpdated 2026-09-29
How to Change Car Air Filter Without Guesswork
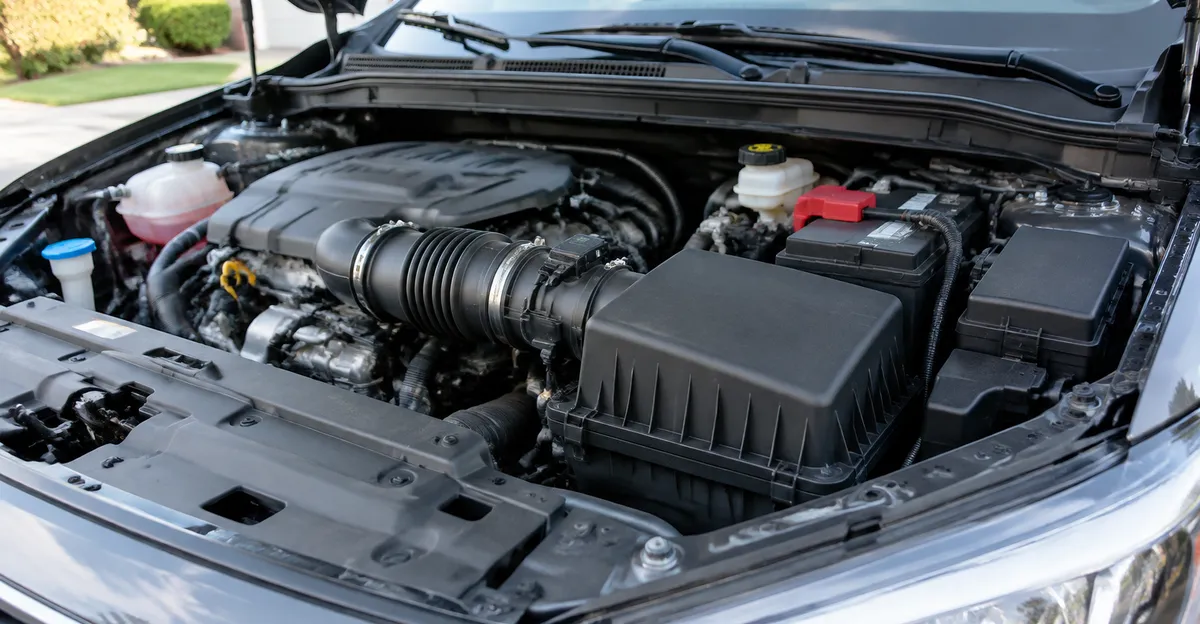
How to change car air filter is almost always an engine-bay job, not a glove-box job. The black plastic airbox under the hood holds the panel that keeps grit out of the cylinders. How to change air filter in car follows the same path on most U.S. passenger cars: buy the correct element for year, make, model, and engine, open the airbox, clean loose debris without pushing dirt into the intake, seat the new filter flat, and latch the lid so unfiltered air cannot sneak past the seal. Cabin filters are a separate part with a separate symptom set; they belong under the dash or at the cowl, not in this housing.
This guide starts from the shared floor already covered by Kelley Blue Book, AutoZone’s DIY filter write-ups, Mopar’s OEM interval guide, and Family Handyman’s replacement advice: correct fitment, airbox location, clip-or-screw access, debris cleanup, oriented install, and schedule-plus-condition intervals. Then it answers the decisions those pages usually leave hanging once you are already in the driveway with a new filter in hand—engine versus cabin, whose mileage number wins, what a bad seal actually risks, when a lagging car is not a filter problem, and when DIY should stop. Nothing here replaces the procedure pages in your owner’s manual for your exact vehicle.
Engine Air Filter Versus Cabin Filter
Search results for “car air filter” mix two parts that share a name and almost nothing else. Mopar’s OEM guide draws the line in one sentence: the engine air filter protects the engine by cleaning intake air; the cabin air filter protects passengers by cleaning HVAC air. Confusing them wastes a parts-store trip and leaves the real restriction in place.
| Clue | Engine air filter | Cabin air filter |
|---|---|---|
| Location | Under the hood in a black airbox tied to a large intake tube | Usually behind the glove box or under the windshield cowl |
| Job | Keep dust out of combustion and sensors | Keep dust, pollen, and odors out of the cabin |
| Typical complaint | Soft power, worse economy, dirty element on inspection | Weak vents, musty smell, more dust on the dash |
| This guide | Yes | No — see HVAC and cabin-care articles when vents are the problem |
If your complaint is warm air from the vents or fog that will not clear, you are not looking for this part. Those paths live on the car AC and fogging guides. If the complaint is soft acceleration, worse miles per gallon, or a visibly gray engine filter, stay under the hood.
How Often to Change Air Filter in Car
How often to change air filter in car depends on the book in the glovebox and the roads you actually drive. Mopar says a general engine-filter band of about 12,000 to 15,000 miles matches roughly a year of average U.S. driving, and it recommends checking the filter at every oil change. The same guide shortens dusty, rural, off-road, or construction-zone use to about 6,000 to 10,000 miles, treats stop-and-go city driving near 12,000 miles, and allows cleaner highway use to stretch toward 15,000. AutoZone’s interval article lands in a similar place: change about every 12 months or 12,000 miles, sooner in dusty or polluted stop-and-go traffic.
Family Handyman reports a longer “normal conditions” line that still appears in many manufacturer schedules: about every two years or 30,000 miles. That is not a contradiction so much as a reminder that the manual is the authority for warranty and design intent. Use the shorter consumer rules of thumb when your roads look like Mopar’s severe list. Use the manual’s longer interval only when inspections keep showing a clean element and you are not eating dust every week.
| Driving pattern | Practical check rhythm | Replacement pressure |
|---|---|---|
| Highway, cleaner air | At each oil change | Often toward the longer end of the manual |
| City stop-and-go | At each oil change | Near 12,000 miles per Mopar / AutoZone guidance |
| Dust, sand, gravel, construction | Every few thousand miles or every oil change | Often 6,000–10,000 miles per Mopar |
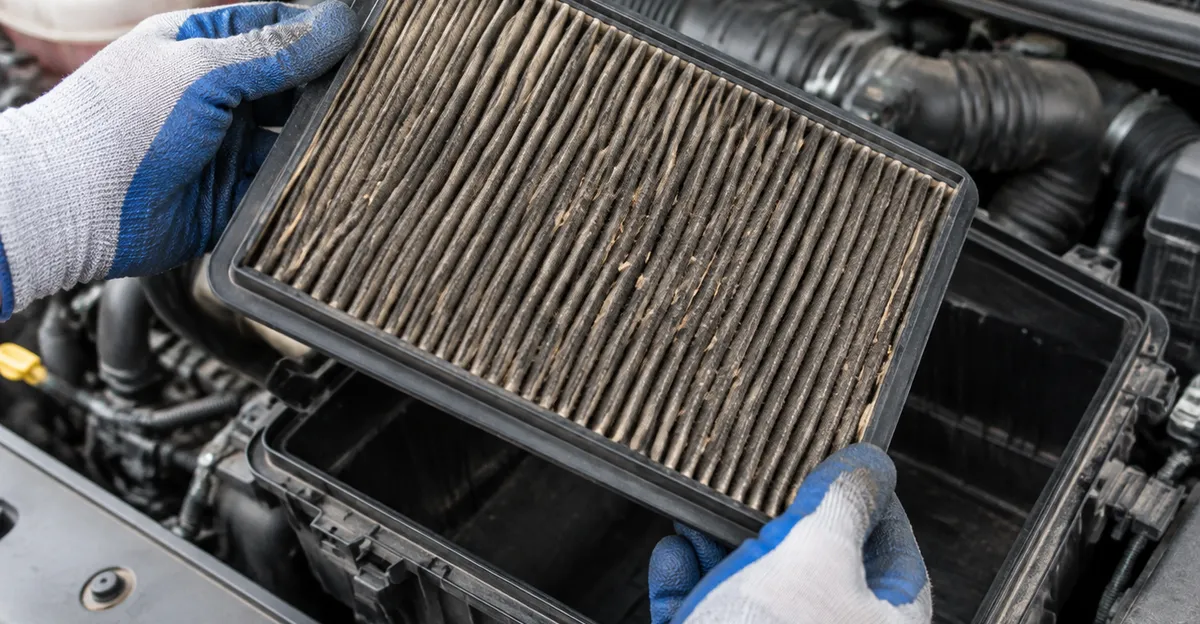
| Unknown history / used car | Open and inspect now | Replace if light cannot pass the pleats |
The light test is the consumer check Mopar and Family Handyman both describe. Remove the element, note which face was up, and hold it toward a flashlight or shop light. If light does not show through the pleats, or if the media is torn, warped, oil-soaked, or crushed, replace it. Family Handyman also warns that a weak seal or dried-out media is a replace signal even when some light still leaks through. Do not wash a disposable paper filter and reinstall it as “cleaned.” That media is designed for one service life.
Tools, Parts, and Safety Before You Open the Box
Kelley Blue Book opens its seven-step guide with fitment: engine air filters are not one-size-fits-all. Match year, make, model, and engine at the parts counter or with the part number printed on the old element. Mopar warns that poor-fitting aftermarket media can leave gaps that let grit into the cylinders. Family Handyman’s expert quote lands on the same goal in plain language: OEM or quality aftermarket is fine if the seal is correct; the only job is keeping dirt out.
AutoZone’s how-to guide budgets about ten to twenty minutes on many cars, asks you to wait until the engine is cool, and recommends gloves so sharp plastic edges do not cut your hands. Photograph the airbox lid, hose routing, and any sensors before you pull a single clip. That photo is cheaper than guessing which vacuum line belonged on which nipple.
| Bring | Why |
|---|---|
| Correct filter for your engine | Wrong thickness or seal shape leaves a bypass path |
| Phillips screwdriver / small socket set | Some lids use screws instead of spring clips |
| Clean rag or shop vacuum | Leaves and grit in the box must come out before the new filter goes in |
| Phone camera | Record orientation and hose routing |
| Gloves | Hot surfaces and sharp plastic edges |
Two safety rules matter more than the tool list. Family Handyman is blunt: never drive without an air filter installed. Particles from a dirty housing can reach the combustion chamber and chew bearings. Second, do not blast the open intake with compressed air aimed toward the engine. Family Handyman notes that shops often blow debris around the bay; your job is to lift leaves out or vacuum gently so grit does not travel down the tube toward the mass airflow sensor or throttle body.
Step-by-Step: How to Change Air Filter in Car
How to change air filter in car on a typical sealed plastic airbox follows the same sequence Kelley Blue Book, AutoZone, and Mopar describe. Your fasteners and sensor layout may differ; the order does not.
- Park on level ground, set the parking brake, and open the hood only after the engine has cooled enough to touch nearby plastic without pain.
- Buy or confirm the correct replacement filter before you open anything. If the old element’s part number is still readable, match it. If not, use year, make, model, and engine at a parts lookup.
- Find the airbox. Kelley Blue Book describes it as a black plastic housing toward one side of the engine compartment, joined to a large intake tube. Follow that tube from the snorkel if the box is not obvious.
- Release the lid. Spring clips pry open by hand. Screws usually need a Phillips bit or an 8 mm socket. Mopar notes that many screws stay captive in the lid—loosen them until the lid frees instead of fishing tiny hardware out of the bay.
- Watch for sensors and small hoses on the lid. Mopar’s DIY steps say to pull vacuum lines and sensors gently so you do not kink or break them. If a connector fights you, stop; forcing a mass-air or intake-air temperature connector is how a ten-minute job becomes a wiring repair.
- Lift the old filter straight up. Keep dirt on the dirty side from cascading into the clean half of the box. Note which face pointed up and which edge faced the intake.
- Inspect the empty housing. Kelley Blue Book and Mopar both want leaves, bugs, and loose grit removed carefully. Vacuum or lift debris by hand. Do not shove dirt farther into the intake opening.
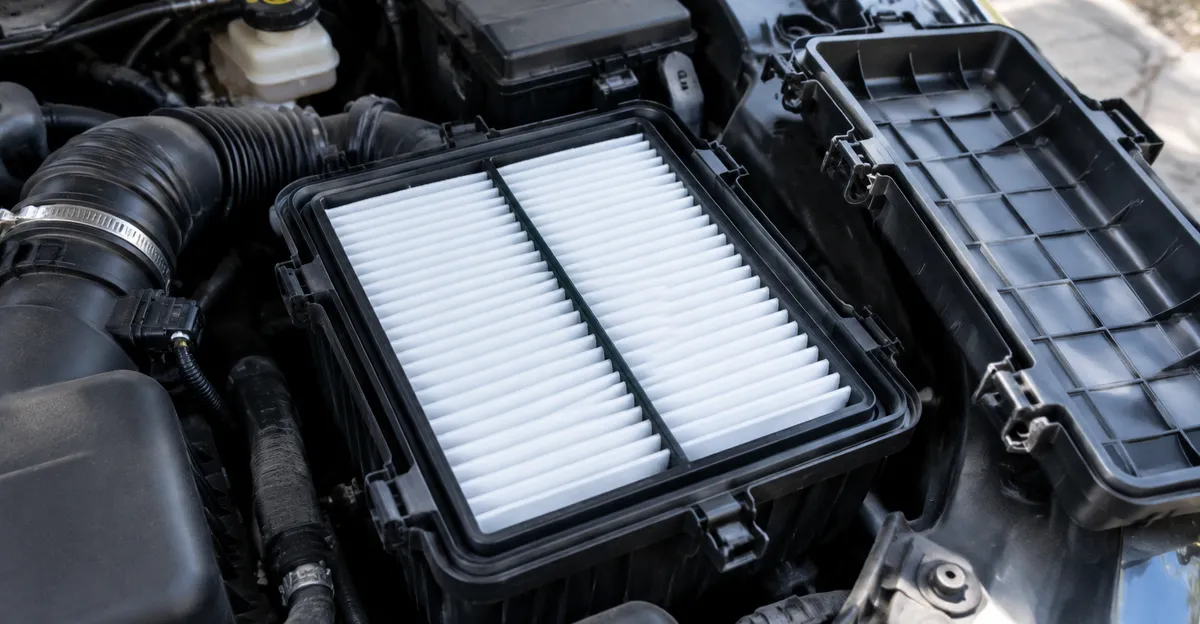
- Drop the new filter into the same orientation. It should sit flat with the rubber or foam seal continuous around the rim. A crooked element that keeps the lid from closing is not “close enough.”
- Refit the lid, align any tabs or notches, reconnect hoses and sensors, then snap clips or snug screws. Do not crush the lid with overtightened fasteners.
- Start the engine and listen. AutoZone’s close-out check is simple: the engine should sound normal, without a whistle from a loose lid or a disconnected hose.
| Mistake | What it costs you | Fix before you drive |
|---|---|---|
| Wrong filter thickness | Lid will not seal; unfiltered air path | Return it; buy the listed application |
| Upside-down or reversed element | Poor seal, warped media | Match the old orientation and any airflow arrow |
| Debris left in the clean side | Grit next to the MAF or throttle | Vacuum again with the intake covered |
| Sensors left unplugged | Rough idle, warning lights, codes | Reconnect until each connector clicks |
| Driving with the lid loose | Whistle, dirt bypass, possible codes | Re-latch and retest |
If the new filter looks identical but the lid still will not close, measure thickness against the old part. Aftermarket “universal” packaging sometimes ships the wrong SKU. Do not force the lid closed on a filter that rides high; that bends the housing and still leaves a gap.
Signs the Filter Is Overdue
A packed engine filter rarely announces itself with one dramatic failure. Mopar’s symptom list is the consumer floor: worse fuel efficiency, sluggish acceleration, black exhaust smoke, and unusual engine sounds. Family Handyman adds Check Engine light risk and broader performance complaints when the media is clogged. AutoZone ties regular replacement to smoother running and better efficiency in plain language without promising a fixed miles-per-gallon gain.
| What you notice | Likely filter story | First check |
|---|---|---|
| Gradual lag, worse in dust season | Restriction building in the pleats | Pull the element; light test |
| Soft power after long overdue service | Neglected filter among several deferred items | Replace filter; if lag remains, dig deeper |
| Musty cabin smell only | Cabin filter / evaporator path | Not this airbox |
| Sudden limp mode with codes | Often sensors, fuel, or catalysts—not just dust | Scan codes; see power-loss guide |
| Whistle after recent DIY | Lid or hose not sealed | Reopen and reseat |
Use the filter as a cheap first check, not as a diagnosis that closes the case. MechanicBase and similar power-loss lists put clogged air filters near the front of restriction causes, but they also list fuel delivery, mass airflow faults, ignition misfires, and exhaust restriction. If a fresh filter changes nothing, you have ruled out one low-cost item. That is progress, not a failed repair.
What a Clogged Filter Does to the Engine and Sensors
Clean intake air is part of the air-fuel math the computer runs every second. Family Handyman explains the upside of a clean filter in those terms: better chance of holding the intended air-fuel ratio, stronger acceleration from freer airflow into the combustion chamber, more accurate mass airflow readings, lower emissions load, and less grit reaching bearings and cylinder walls. Flip those sentences and you have the downside of neglect: the engine works harder for the same throttle input, sensors see a distorted air stream, and abrasive dust that bypasses a torn or missing filter becomes wear you cannot reverse with a parts-store spray.
A torn filter or a lid that never sealed is worse than a dirty but intact one. Dirt that never meets the media goes straight toward the mass airflow sensor and the throttle body. That is why seating the seal matters as much as buying a name-brand box. Mopar’s warranty language is blunt about low-quality filters that cause engine damage: damage tied to a bad non-OEM part can fall outside coverage. You do not need fear marketing to take the seal seriously. You need a filter that matches the housing and a lid that clicks shut.
If a Check Engine light came on with airflow or fuel-trim codes, replacing a black filter is still reasonable, but clear or recheck codes after the install. A contaminated mass airflow sensor can keep the complaint alive after the paper element is new. Cleaning a MAF belongs to a careful procedure with the right cleaner, not carburetor spray. When power stays flat after a confirmed clean intake path, follow the broader power loss while driving checklist instead of stacking more intake parts.
DIY Versus Shop: When to Stop
Kelley Blue Book compares engine air filter changes to windshield-wiper work: reachable, low-tool, high confidence on many vehicles. Family Handyman explains why shops still charge labor: modern housings can sit under covers, brackets, and hoses, and sensors may need to be disconnected. Expect roughly fifteen minutes or longer in a bay when access is poor, with labor often in the twenty-five to fifty dollar range plus a marked-up filter. DIY savings are real when the box is in plain sight. They disappear when you break a sensor connector to save thirty dollars.
Stop DIY and book a technician when any of these show up:
- The airbox is under an engine cover or battery tray you cannot remove with the tools and instructions you have.
- A sensor connector or vacuum hose will not release without force.
- The lid uses hidden screws you cannot see without lifting other parts.
- The replacement filter will not sit flush and the lid will not close after two careful attempts.
- You find oil, coolant, or animal nesting material in the housing—Family Handyman recounts a nest that clogged a filter so badly the engine would not start. That is a cleaning and inspection job, not a casual swap.
Reusable oiled “performance” filters sit outside the ordinary disposable path. Family Handyman cites an expert who avoids oil-covered performance filters for most owners because poor cleaning habits let dust through. Mopar notes that reusable and cold-air setups can add power when they are designed and tested for the vehicle, but they are not the default maintenance answer for a daily driver who just wants the factory airbox sealed again. If you already run a reusable element, follow that maker’s cleaning schedule exactly; do not treat it like a throwaway panel.
Oil service and air-filter service often land on the same visit. That pairing is convenience, not proof that every oil change must include a new air filter. Check the element when the oil is changed, as Mopar suggests, and replace it when the light test or the manual says so. Pairing the jobs does help you remember the inspection. For why the oil itself still needs its own schedule, see why cars need oil changes.
After the Swap: Confirm the Fix
Start the engine and idle for a minute. Listen for intake whistles. Rev lightly in park or neutral only if the area is clear and the transmission is secure. Take a short drive that includes the same hill or merge where the car felt soft before. If throttle response returns, you have a confirmed restriction story. If nothing changed, leave the new filter in—you still needed it on schedule—and move to fuel, ignition, exhaust, or sensor checks rather than chasing a second air-filter brand.
Document the date and odometer in the glovebox or a phone note. The next “how often” decision becomes easier when you know when the last element went in. Keep the receipt if the car is under warranty and you used a quality filter that matches the application.
FAQ
how often to change air filter in car
Mopar’s OEM guide says most engine air filters land near 12,000 to 15,000 miles, with dusty or off-road use closer to 6,000 to 10,000 miles, and cleaner highway driving sometimes stretching toward 15,000. Family Handyman notes that some manufacturer schedules still list about two years or 30,000 miles under normal conditions. Always prefer the owner’s manual for your year and model, then shorten the interval when roads are dusty, sandy, or near construction.
Is the engine air filter the same as the cabin air filter?
No. Mopar separates them clearly: the engine air filter cleans air headed into the combustion chamber; the cabin air filter cleans air headed into the HVAC vents. This guide covers the engine filter in the black airbox under the hood. Cabin filters usually sit behind the glove box or under the cowl and are a different part number and job.
Can I replace an engine air filter myself?
Kelley Blue Book treats engine air filter replacement as one of the more approachable DIY jobs because many cars need only a few minutes, the correct filter, and maybe a screwdriver. Stop and pay a shop when the airbox is buried under covers and hoses you cannot identify, when sensors on the lid will not unplug cleanly, or when the new filter will not seat flush and the lid will not close.
What are signs a dirty engine air filter needs replacement?
Mopar lists reduced fuel efficiency, sluggish acceleration, black smoke from the exhaust, and unusual engine sounds among engine-filter warning signs. Family Handyman adds that a clogged filter can contribute to a Check Engine light and performance problems. Confirm with a visual check: hold the element to a light; if you cannot see light through the pleats, or if the media is torn, replace it.
How much does an engine air filter cost?
Family Handyman cites a typical filter around twenty-five dollars at retail, with shop labor often about twenty-five to fifty dollars plus a parts markup when the housing is buried. AutoZone’s consumer guidance puts many engine filters in a low tens-of-dollars range. Exact price depends on the vehicle and brand; treat those figures as approximate, not a quote for your car.